Treats!

Although in the beginning, it is best NOT to give any treats…. once your EPI dog is stable…. we do have some treat ideas!
SOME TREAT SUGGESTIONS:
One question that comes up over and over with newly diagnosed cases of EPI is “What treats can my dog have?” Unfortunately, treats should be eliminated until the dog is stable, meaning good poops consistently for at least 3 months. As impossible as it sounds, especially if you’re training your dog, it can be done, and many of us on the forum have done it. I’m not the first to say that this is usually harder on you than on your dog. The reasoning behind this is that at the beginning of this roller coaster ride, finding what works for your dog is largely a matter of trial and error. If you continue to give treats while changing other things and you don’t have success, you will not really know if the lack of progress is due to not having made the right changes or that the treats aren’t being tolerated. And if it’s not tolerated, it can cause SID (small intestinal dysbiosis) to no longer be under control which we would all like to avoid. The good news is that there are options you can try other than treats for rewards. Some people have found that their dogs are very toy-motivated and are easily rewarded with a favorite toy. Others are motivated by tug games and attention (pets and scratches) from you! Some dogs love ice cubes and those can be used as occasional treats, too.
The even better news for people like me who are better at rewarding with treats than toys, is that once your dog is stable, there are a variety of options for treats you can give your EPI dog. The following is a collection of ideas that I have taken straight from the EPI parents on the forum. Some of our members have been very creative in finding what works for their dogs and very generous to share with everyone else…Thank you everyone whose ideas I’ve stolen for this! And I apologize if I’ve missed someone’s great idea…there were just so many posts to look through, I couldn’t read them all. Please feel free to share any other ideas on the forum!
Always remember with EPI dogs that every dog is different. What works for one dog may not work for another. So these are ideas that you can try. Just keep a close eye on how your dog reacts with any of these,and keep trying until you find one that works for your dog. Also, I would recommend starting with just a very few treats at one time. Once you see that your dog can tolerate those few, you can gradually increase the amount you give per day.
….. here are a few treat suggestions and techniques that have been used successfully by members on the ep4dogs forum.
REGARDING DEHYDRATORS: when using a dehydrator, before dehydrating…. you might want to check the temperature setting with an actual thermometer first. It is very important when dealing with enzymes to not exceed a certain temperature so as not to destroy the efficacy of the enzymes. As noted by one of our members who found that the actual temperatures were 15 to 20 degrees F above what was set on the controls of the recommended dehydrator. Thank you Rich Derengowski for this great suggestion!
THANK YOU to Shirl (Pixie’s mom) for taking the time to compile (all in one place) the following wonderful treat suggestions!
GREAT NEW TREAT IDEA…… ENZYME ICING! (not baked or frozen… hardens naturally)

If you want to make your own baked cookie treats…. with whatever ingredients your pup can tolerate…. after the cookies are baked…. cover with this enzyme icing:
ENZYME ICING
1/8 cup of cornstarch
1/16 cup of water
1 tsp of honey
1/2 tsp of enzyme (powder)
Start with the above…. if mixture is too soupy… sprinkle a little more cornstarch in the mixture.
Try it…. if you think more enzymes are needed to address the ingredients in the cookies… add more and just play around with the amount of cornstarch, water and honey until you get a good “icing” texture.

There’s a homemade dog treat called Salmon Crack that every dog I know seems to LOVE, including Pixie. In agility class, if another handler has salmon crack, Pixie will run off the course to beg from them! Unfortunately for Pixie, it is made with flour which she, of course, can’t have. I tried making a couple batches with grain-free alternatives, but the first two didn’t come out well at all. I tried again last week and it came out perfect! Pixie loves it and she can have it! Score! I thought I would share the recipe with you, so here it is:
SALMON CRACK:
1 small can of salmon, undrained (I think my can was around 6 oz)
2 eggs
Puree together in small food processor
To food processor, add equal amounts of:
Arrowroot flour
Potato flour
(eyeballed it….don’t know measurements – I aimed for the consistency of a slightly dry dough)
Mix in food processor until mixed and you have a doughy ball. Slightly dry is good since you will be adding a little water with the enzymes.
Add in appropriate amount of enzymes mixed with a little bit of water. Kneed the enzymes in by hand (just because my dough was so stiff).
Roll dough out between 2 pieces of wax paper to the thickness you want. Mine were probably 1/4 inch thick or so.
Cut into strips. The dough should be the consistency to hold together when cut into strips. If the consistency isn’t right, feel free to add more flour or more room temperature water to get a good slightly dry dough consistency.
Place strips on dehydrator. Keep an eye on them. I think it took about 3 hours or so? I left them a little soft so they wouldn’t crumble and I could cut them. I store them in the refrigerator.
Sweet potato with enzymes!
Lucy’s mom shared the following on the forum (thanks!) :
We knew that we couldn’t give Lucy any more non-enzyme treats, so I searched frantically to find a solution. There were a number of great ideas on this site and I found a few others as well.
However, we have another dog the same age as Lucy who doesn’t suffer from EPI but was equally suffering from the “no treats” policy we had imposed. I needed to find a solution where they each got “equal” treats.
I have found that using a mandolin to slice well-scrubbed sweet potatoes into circles gives me the easiest way to ensure the slices are even and all dehydrate at the same rate. Because only half the treats need to be treated with enzymes, I fill 2 or 3 trays with sliced sweet potatoes for Dolly (the healthy dog) and the same number of trays for Lucy. For Lucy’s treats I mix 1 tsp of 8X enzymesdiane with a tablespoon of water per sweet potato – usually I can fill 1 tray with slices from 1 sweet potato. So for 2 trays, use 2 potatoes and 2 tsp. of the enzymes with 2 tbsp. of water. I spread the enzyme mixture on the potatoes in Lucy’s trays with a basting brush. I set the dehydrator to 120 degrees for 5 hours. When finished, I put the treats in separate freezer bags so as not to mix them up. The dogs both love these treats and they are a great way to ensure your EPI dog continues to receive daily “rewards”. Another way I use to distinguish between the enzyme treats and the plain is to sprinkle dried kelp or an herb on one of the batches.
I hope this helps someone who finds themselves wanting to treat 2 dogs the same when only one has EPI.
Dehydrated Kibble-Jerky

an actual jerky tool – – and head which is similar to a frosting head used in baking.
My boy doesn’t tolerate anything but his enzymed kibble so I make enzymed kibble jerky. I grind the kibble to a fine powder, mix in the water and enzymes as usual, incubate as usual and then use a jerky tool to make jerky strips and dehydrate at 120 degrees for 7 hours. If you don’t have Jerky Tool, which looks like this you can use cookie / frosting baking tool
Madelon & Doc
Dehydrated Treat Balls
I’m going to start with what I use, because that’s what I know. I make my own treats with a dehydrator. Some people have used the oven also, but heat kills the enzymes, so the treats must be prepared at less than 130 degrees Fahrenheit. Many ovens will not go that low. Olesia posted this information on the forum: I have an Excalibur Dehydrator and they explain that the best way to preserve living enzymes and to overcome any possible spoilage or bacterial growth is to: “set the dehydrator on the highest temperature setting for the first 2-3 hours, then turn it down to less than 120 degrees F or 49 degrees C for the remaining time. During the initial hours the food temperature will not exceed the 118 F or 47 C temps because of the high moisture content in the food ” ;)…. consequently preserving the enzymes.
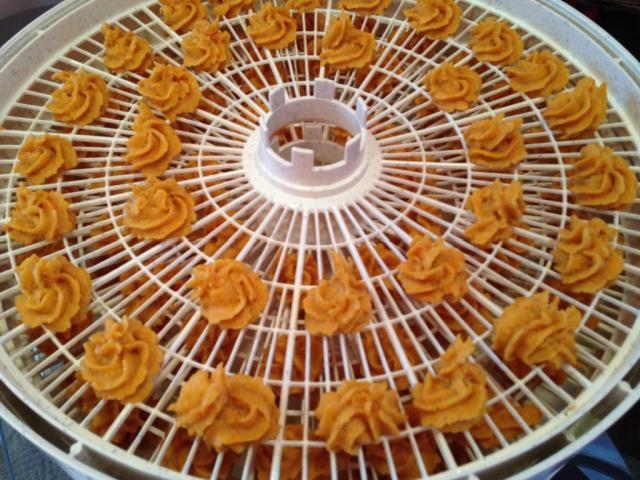
The treats I make are based on a recipe Michele posted on the forum a while ago for treats that she makes using a dehydrator. H
I have adapted this a little for my dogs. You can use whatever meat you like (I use lamb because one of my other dogs can’t have beef and then I can give the same treats to all the dogs). For some reason, though, I had trouble with the strips crumbling. I just couldn’t get it right. So now instead of making jerky-like strips, I make little pea-sized dots with a large cake decorating tip. They are the perfect size for a treat during class, and they don’t crumble as easily as the strips did. It’s time consuming, but they will last for weeks in the fridge. Here are 2 pictures of before and after they go into the dehydrator:


Dehydrated Beef Pancreas:
The perfect treat for an EPI dog is dehydrated beef pancreas. However, the beef pancreas must be sliced in extremely thin pieces and then (in the past) it was recommended to be dried at a temperature no higher that 118F degrees to preserve the enzymes in the beef pancreas. More recent research now states that enzymes remain viable up to 140F degrees… so… if you have a dehydrator.. and can set the temp at less than 140 you can feed dried beef pancreas and the natural enzymes will still be viable… which would be a perfect treat for an EPI dog!
Other Dehydrator Ideas:
– Make up kibble as if for a meal, then dehydrate at less than 130 degrees.
– Dehydrate small, thin pieces chicken sprinkled with enzymes…slow dry at 105 degrees.

Organ meats
Members have used beef heart, diced into little cubes, baked at 250 F, until the little cubes were slightly hard with still sort of a soft center. Turn these cubes over every so often while baking.
– beef liver, beef heart or beef kidney or chicken liver, bake in the oven at about 250 / 300 degrees F. for about 45/+ minutes (or until the meat has a skin on it or somewhat of a crust, but the inside of the meat is still soft) cut into small cubes and give as a reward or treat.
These were used without added enzymes, but please remember that what each dog can tolerate is different. If you try this method, I would recommend beginning with just a very few treats at a time and work the amount up slowly so that you know how many of these treats your dog can tolerate at one time. Also, remember that the dogs typically don’t really care how big the treat is, so the smaller you cut the pieces, the more pieces you can give = more rewards from the same amount of food.

Freezer ideas
– Ice cubes, or ice cubes made from chicken broth.
– Enzymed, incubated food frozen in ice cube trays.
– Grind leftover meat, mix with equal part water – add enzymes and incubate – freeze in ice cube trays.

Freeze Dried
Freeze dried liver, but not real often…and usually near a meal.
– For training sessions, take something like cooked chicken livers (or something that she can eat that you can mash), add enzymes …mix well (need a paste consistency) and then put some in a small squeeze bottle. Take bottle with you to training, and when time for a reward just squeeze a little dab in the dog’s mouth as the reward. You could also use their kibble for this. Grind it up in the food processor and add water to make the paste, then add enzymes. This “paste” idea would also be great in a Kong.

– Diced dried apple – it seems to go through completely undigested and retains its shape, so does not seem to have an effect. It does not need refrigeration, does not get too sticky, and is easy to have a baggie full. Go easy on the quantity to start.

Ideas for Chewers
– Raw meaty bones or marrow bone for the teeth, 2 or 3 times a week, 20 minutes before or after meal time so there are enzymes in the system.

– White, real, boiled bones (can find at PetSmart)….. it is an actual bone, but nothing is on it… no meat, grease or fat, it is not dyed, no coloring, flavoring or anything….simply a bone (heavy BIG bone) that is bleached…..

– Naturally shed deer antlers
Or…. get creative…
- Scrape out some of the marrow in a small bone, mix in enzymes then pop it back it.
- A technique from Jean (owned by Kara)
what I did to encourage Kara to behave
lambs liver and a pinch of garlic powder, pan fry, with a tiny bit of oil or calorie free spray oil if you have it over there
garlic given invery small amounts is ok and if its only for training then fine
its called “fry light” here
ok, so fry, and let cool, wizz in your blender,its then like crumbs, make into tiny patties and freeze till needed
take some out, add enzymes when defrosted, and train
3. a technique by Leanne used with her dog Gus
Gus was about 15 months old when diagnosed so we were still heavily into training and needed treats for rewards. I give him small cubes of chicken breast – I just put it in the microwave on autocook and then cut into small pieces. We use Creon here, so I just give him a Creon before we take off for class and I haven’t had any problems with that
4. Staci’s dog “Dizzy” cannot handle any “treats” without enzymes… so… Staci dehydrated dog food after IN INCUBATES…. Dizzy loves these treats!
5. Pamela gives Lakme a tiny piece (like the size of a pencil eraser) of dehydrated liver…. this seems to work. Pamela also is going to start training and got a squeeze bottle that Pamela will put some enzymed food in and squirt as a treat.
6. Ann shared this recipe with Michele:
Ann shared a recipe and I modified it this weekend and made some simple treats which so far are going great – I do only give maybe 2 or 3 a day. I measured it out and it came to 4 cups so I added appropriate amount of enzymes. Used a pastry tip on a plastic bag and WALA! I did have to let it dehydrate at 120 farenheit for 15 hrs but it is well worth it
2 cups almond flour
2 huge sweet potatoes (cooked in microwave until done – then peeled)
2 huge tablespoons of peanut butter
1 large carrot grated
7. Boxer Dad found success with Sweet Potato treats
8. Olesia makes her own sweet potato treats in the Dehydrator

Take a fresh, whole sweet potato
Peel the outside skin and throw away.
Shave the entire sweet potato with a potato peeler (except for a little piece at the end cause it is too hard to hold on to :D)….
Arrange the shaved pieces on the dehydrator trays…. i don’t fuss too much with this… just so long as there is not a clump of shavings together…
Dehydrate at 135 for about an hour (does not kill any live natural enzymes because there is still moisture in the shavings) …. and then drop the temp down to 115 for the next hour…. usually this is all it takes.
I put in mason jars with 1 silica pac (just in case there is a piece with some moisture in it that i did not notice)
3 potatoes fill 9 Excalibur dehydrating trays!!!! i am guessing this costs a few pennies???? As I buy a whole case of sweet potatoes for $12
9. Deb made the above Sweet Potato peel treats using a microwave
I did the shavings like Olesia has. I put some in the oven at 50 degrees celsius and some in the microwave. I microwaved at 100% for 2 minutes. They are crispy and look like Olesias. Kody, Ozzy and I have all tasted them and they seem fine. I gave up on the oven – they were taking ages and I got sick of checking them and it’s too hot to have the oven on, so I finished them in the microwave.
I googled about making crisps – the most important thing is when I peeled them I let the shavings drop into a bowl of cold water and let them soak for about 5 minutes. I then ran them under fresh cold water for a minute and dried them thoroughly between paper towels until most of the moisture was out. Apparently, they won’t crisp up if you don’t rinse the starch out of them.
I’m very impressed – So easy to make a batch at the same time as I do the mash
10. Trisha stuffs a small kong with incubated food from a meal and freezing it. Than serving the kong that way. My dog likes it and he still gets his enzymes!